

7 Steps to Ensure Website Security for Your Business Website
If your corporate or enterprise website has ever been compromised by malware, it can cause major disruptions to your business operations and damage your brand reputation. However, with the right process and tools, you can quickly remove malware and fortify your website’s security.
As website security experts in Malaysia, we at Skytomato have developed a seven-step process to help business owners thoroughly clean malware and protect their websites with Managed Website Security in Malaysia. Continue reading to learn our recommended steps for any organization looking to boost Website Security Malaysia for their business website.
Step 1: Backup your WordPress Site and Database
Removing malware can be messy, and sometimes things can go wrong in the process. That’s why we want to make sure we have a backup that we can restore if something goes wrong.
To back up your WordPress site, you’ll need to do a manual backup. Upload all the files and folders from the root folder of your WordPress site using your file manager or an FTP client, and then export your WordPress database. Depending on your hosting provider and package, you can also create a compressed archive (.zip) of your public HTML or http docs directory directly from your cPanel file manager. You can also check to see if backups are available as part of your hosting or security package.
If you have a clean, functional backup of your website, the path of least resistance may be to simply restore it and skip the malware removal process entirely. However, if your website has a blog or is frequently updated with new content, this may not be a viable option.
Next, let’s look at how to back up your database. Once you have access to phpMyAdmin or your site admin, follow these steps:
phpMyAdmin
- Open the phpMyAdmin panel and select the database for your WordPress site. This is the database you created when you installed WordPress.
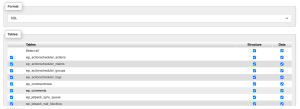
- Click Export in the top menu and select Custom as the export method. In the Format drop-down list, select SQL and select All tables.
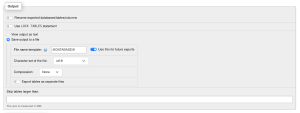
- In the Output section, check the Save output to file checkbox and select No compression if your site is standard size. If your site is large, you should select a compression style.

- Select Export at the bottom to save the database to your computer. SQL
- In the Output section, select Save output to file and select No for Compression if your site is standard size. If your site is large, you will need to select a compression style.
Admin
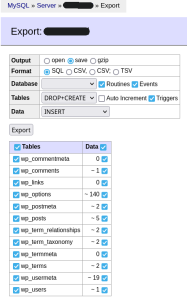
- Select the database where your WordPress data is stored.
- Click Export at the top.
- In the Export section, leave all tables selected by default. In the Output section, check the Save checkbox.
- If your site is standard size, select “None” for the Compression option.
- If your site is large, you should select a Compression style. Select SQL as the Format.
- Make sure you select both the structure and data you want to export.
- Click “Export” and the backup will be saved to your computer as a .SQL file.
Step 2: Check Recently Modified Files and Scan WordPress for Malware.
There are several ways to check if a hack is part of your site, such as by looking at cPanel or SSH to see if new or recently changed files are present.
SSH: Checking with the ls command
- Log into your server via SSH and navigate to your site’s home directory.
- Run the following command:$ ls -1tlah | head -10
- View the most recently modified files, starting at the top.
SSH: Checking with the find command
- Log into your server via SSH and navigate to your site’s home directory.
- Run the following command:
$find. -type f -m time -90
- The output will show files that have been modified within the last 90 days.
- Look at these files. Unfamiliar changes in the last 90 days can be suspicious and should be addressed by a professional Website Security Malaysia service.
Check recently modified files in cPanel.
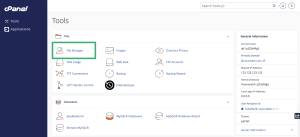
- Log in to cPanel and go to File Manager.
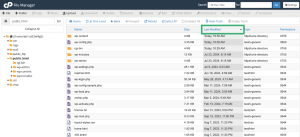
- Go to your site’s home directory and click on Last Modified Date. You will see the files with the last modified date at the top.
- Check your wp-content/plugins and wp-content/themes directories for suspicious or suspiciously common plugin names. Attackers love to load these into compromised environments.
Use FileZilla to check recently changed files.
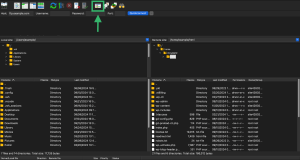
- Open the FileZilla client and connect to your website via FTP or SFTP.
- Select the Filename Filter icon from the top menu.
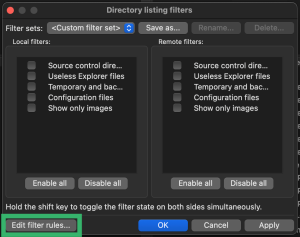
- Select Edit Filter Rules from the pop-up menu.
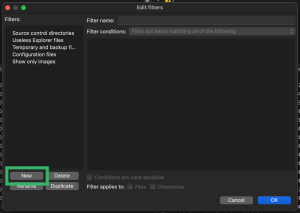
- To create a new filter, select New.
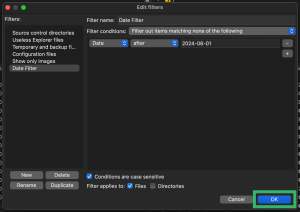
- Name your new filter with something easy to remember, such as Date Filter.
- Add filter criteria. For the filter criteria, select ‘Filter items that do not match any of the following.’
- Select “Date” from the first drop-down list, then enter the date in the second drop-down list that matches the date you want, in the format “YYYY-MM-DD”. Uncheck the box called Directory.
- Make sure the filter settings are as follows, then click OK.
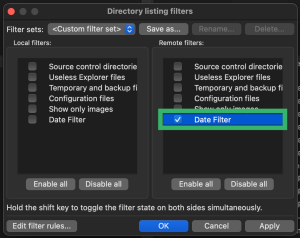
- Check the box next to the new filter, click Apply, and then click OK to close the window.
This will filter out all files that have not been modified in the specified time period, allowing you to quickly find the most recent modifications in each directory when searching for malware.
 This will filter out all files that have not been modified in the specified time period, allowing you to quickly find the most recent modifications in each directory when searching for malware.
Step 3: Remove Malware from Site Files
If the infection occurred in core files, download a fresh installation file from the official WordPress site and use it to replace each corrupted file.
Warning: Do not overwrite the contents of the wp-content directory or replace the wp-config.php file without guidance from an experienced Website Security Malaysia provider.
Clean up the hacked WordPress core files:
- Check the wp-includes/version.php file to note the version of your WordPress site.
- Go to the official WordPress website and download the version that matches your site.
- Extract the WordPress installation to your computer.
- Access your site files via SFTP/FTP or your hosting account.
- Replace infected core files with clean copies.
Manually clean up hacked WordPress plugins and theme files.
- Download a clean copy of the plugin/theme from a working backup or the official WordPress site.
- Extract the plugin/theme copy to your computer.
- Log into your file structure via SFTP/FTP or your hosting account.
- Replace the appropriate plugin/theme folder in ./wp-content/plugins or ./wp-content/themes with a clean copy.
- Open the custom or premium file (not in the official repository) using a text editor.
- Remove any suspicious code from the custom file.
- Verify that your site continues to work after the change.
IMPORTANT: Do not erase changes to themes or plugins by restoring from a clean backup without guidance. Clean up hacked WordPress plugins through your control panel or with help from an expert Website Security Malaysia provider.
Step 4: Remove Malware from Your Site Database
To manually clear your database, check your database tables for suspicious content. For example, spam keywords and links. Potentially dangerous PHP functions include base64_decode, gzinflate, error_reporting(0), and shell_exec.
After removing the suspicious content, check if your website is working. If not, you can re-download your database from a backup or contact your webmaster or security provider for assistance. It is important to clear the database before moving on to the next step.
Step 5: Remove Warnings from Your WordPress Site
If your WordPress site has been cleaned up and hacked and blocked by Google, McAfee, Yandex (or any other provider), request a review. You will need to submit a review request form to each agency that has blacklisted your site.
- If your site has been blocked by your hosting provider, you will need to contact them directly to request the removal of the block. In most cases, you will need to provide details about how you removed the malware.
- Submit a review request to each agency that has blacklisted your site. While we have helpful guides on how to remove Google warnings or fix McAfee SiteAdvisor warnings, you may also want to check out other popular search engines like Bing, Norton, and Yandex.
Step 6: Modify Core CMS Files, Plugins, and Themes
To update core files from the control panel, go to the Updates option in the sidebar. You will be redirected to the WordPress Updates page. When you see the message “An updated version of WordPress is available,” click “Update Now.”
To update plugins from your WordPress website dashboard, go to the Plugins section and click Installed Plugins. You will then be redirected to the Plugins page, where you can see all the plugins installed on your website. If there is a new version of the plugin, you will be notified. To update the plugin, click “Update Now”.
To update the theme, go to Appearance and click on Themes. Like the plugin, and you will be notified when there is a new version of the plugin. To update the theme, click “Update Now”. If you have custom code in your theme files, be sure to back them up before upgrading.
Step 7: Protect Your WordPress Environment
Update WordPress
While your WordPress version helps protect your site from attacks, attackers may still try to use older, vulnerable versions of WordPress, so it’s important to keep your site up to date.
Install a Security Plugin
A fully configured security plugin allows you to seamlessly apply additional security options to your site.
Now your WordPress site is malware-free and running smoothly. More importantly, you’ve hardened it against future threats by establishing regular Website Security Malaysia best practices including backups, updates, and assistance from experts. For the strongest ongoing protection, outsourcing to a leader in Managed Website Security in Malaysia is ideal.